Essential Gas Grill Safety Checks Before You Cook
Before you roll that tank out of the garage or fire up a grill that's been sitting all winter, there's one question that separates a great cookout from a trip to the ER: what should i do before using a gas grill? It's not just about scraping the grates and hoping for the best. The difference between a safe, even sear and a grease-fueled fireball comes down to a handful of checks that take about ten minutes.
Here's the thing. According to the National Fire Protection Association, gas grills are involved in an average of 5,700 home structure fires per year in the U.S. alone. Most of those fires trace back to a dirty grill, a gas leak, or a mechanical failure that went unnoticed.
The good news? Nearly every one of those incidents is preventable with a quick, methodical inspection routine. Let's walk through it, step by step.
Quick Answer
Before using a gas grill, check the fuel line and connections for leaks using soapy water. Inspect the hose for cracks and dry rot. Clear the venturi tubes and burner ports of spider webs and grease.
Open the lid before turning on the gas. Clean the drip tray and cooking grates. Then preheat on high for 10 to 15 minutes.
Why This Checklist Matters More Than You Think
Most people assume grill maintenance is about cleaning. It's really about physics. Gas under pressure flows through a narrow path, mixes with air, and ignites.
If anything blocks that path, you get one of two outcomes: a weak flame that can't cook, or a buildup of gas that ignites all at once. That sudden ignition is what causes the whoosh of flames that singes eyebrows and melts handles.
The other silent killer is corrosion. A regulator that sits out in the weather for a year can develop internal damage that messes with pressure. A rubber hose exposed to sunlight can develop micro-cracks that leak propane at a rate your nose won't even detect until it's too late.
Here's the reality. As of 2026, most grill owners report spending less than five minutes on pre-grill inspection. Manufacturer specifications from major brands like Weber and Napoleon indicate that a full safety check should take closer to fifteen minutes.
That gap is exactly where fires start.
The cost of skipping this routine isn't just the grill. It's the deck, the house siding, and potentially worse. A little discipline before every cookout is the cheapest insurance you'll ever buy.
Understanding Your Grill's Setup: Propane vs. Natural Gas
Your pre-grill checklist starts with knowing which fuel system you're dealing with. The steps are similar, but the specific failure points differ.
Propane Grills
Propane grills use a portable 20-pound cylinder with an Overfill Prevention Device, or OPD valve. That's the triangular knob on top that screams "turn slowly." The OPD valve is designed to stop the flow of gas if it detects a rapid release. That's great for safety, but it creates a common annoyance: if you open the valve too fast, the regulator can trip and shut off the gas entirely.
The fix is simple. Close the tank valve completely. Wait about 30 seconds for the pressure to equalize.
Then open it slowly, a quarter to half turn, and pause. You should hear a faint hiss that stops quickly. If the hiss continues or you smell gas, you've got a leak at the connection point.
Natural Gas Grills
Natural gas grills wire directly into your home's line, so there's no tank to check. Instead, your focus shifts to the flexible supply hose that connects the grill to the house. These hoses are rated for natural gas, but they still degrade over time.
Look for kinks, cracks, and wear points where the hose rubs against the grill frame.
Here's a key difference. Natural gas hoses are typically rated for a higher flow rate than propane hoses. You can't just swap them.
If you're replacing a hose, you need one specifically rated for natural gas service. Using the wrong hose can restrict flow or, worse, leak at the connector.
Regulator Fundamentals
Both systems rely on a regulator to step down the pressure from the tank or supply line to something the burner can handle safely. Most residential grill regulators are set to deliver about 11 inches of water column, which translates to roughly 0.4 psi. That's a set point you won't adjust, but you should know it exists.
The regulator has a small vent hole on the underside. That hole is designed to equalize pressure inside the diaphragm. If it gets clogged with spider webs or insect debris, the regulator can't function properly.
The result is a burner that flames yellow and weak instead of blue and clean.

The Leak Test: Non-Negotiable and Dead Simple
This is the single most important check you'll do, and it costs nothing but a little soapy water. Here's how it works.
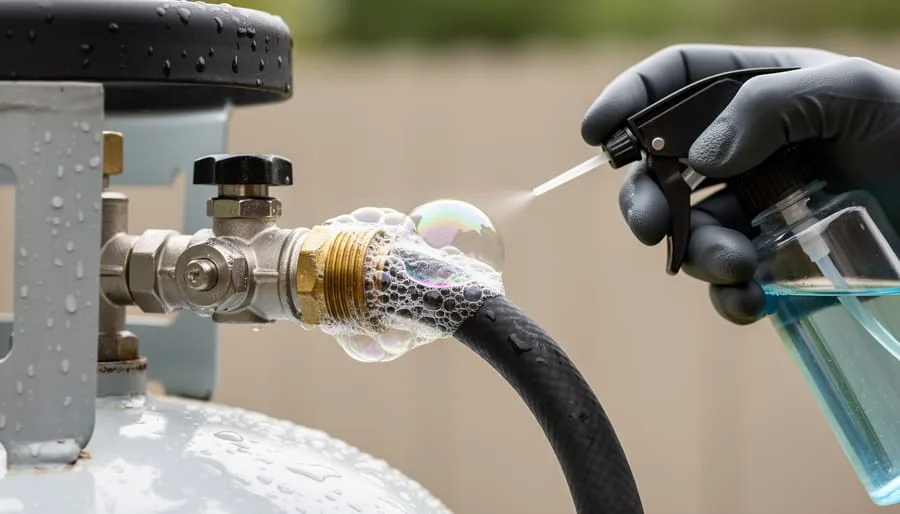
Mix a few drops of dish soap with water in a spray bottle. Dish soap creates larger, more visible bubbles than hand soap. Spray the solution generously over the connection points: where the regulator attaches to the tank valve, and where the hose connects to the regulator.
Then open the gas valve slowly. Watch the soapy water carefully. If you see bubbles forming and growing, even tiny ones, you have a leak.
Big bubbles mean a serious leak. Small pinprick bubbles mean a slow weep that will still cause problems over time.
If you find bubbles, tighten the fitting and retest. If bubbles persist, the fitting is damaged or the gasket is worn. Replace the part before you even think about lighting the grill.
Here's what most people miss. The tank valve itself can leak. It's rare, but it happens.
So spray the soapy solution on the valve body too, not just the threads. A leak there means the tank needs to be replaced or serviced.
One more thing. Never use a match or lighter flame to check for gas leaks. That's how people lose their eyebrows.
The soapy water method is more reliable, cheaper, and won't set anything on fire.
The Venturi Tube and Burner Port Check: Where Spiders Hide
Spiders love gas grills. It's not a joke, it's a documented phenomenon. The venturi tubes, those metal tubes that mix air with gas before it reaches the burner, are dark, warm, and protected.
Perfect spider real estate.
The problem is that spider webs and insect nests can partially or completely block the air flow through the tubes. When that happens, the gas doesn't mix properly with oxygen. You get a lazy yellow flame instead of a crisp blue one.
More importantly, the gas can pool inside the tube and ignite in a small explosion called a flashback.
The fix is straightforward. Visually inspect the venturi tubes before every cookout, especially after winter storage. Shine a flashlight through the opening at the control end.
You're looking for webs, eggs, dead insects, and general gunk.
If you see debris, don't use a metal tool that could scratch the tube interior. A pipe cleaner, a small bottle brush, or a blast of compressed air works best. Some grill owners use a flexible plastic brush designed for cleaning thermoses.
The key is to clear the blockage without enlarging the opening or damaging the surface.
Burner Ports: The Next Blockage Point
Once the tubes are clear, check the burner ports themselves. These are the small holes or slots along the top of the burner where the flames emerge. After a few cooking sessions, they accumulate grease, food particles, and carbon buildup.
Clogged ports create uneven flames. You'll see a weak burner on one side and a roaring fire on the other. That unevenness leads to hot spots, cold spots, and an increased risk of flare-ups when grease drips onto the hottest section.
To clear them, turn off the gas and remove the burner assembly if possible. Use a paperclip or a small wire to gently poke through each port. Don't use a drill or a power tool.
You'll enlarge the holes and change the flame characteristics permanently.

The Regulator and Hose Inspection: Cracks, Dry Rot, and Common Failure Points
The rubber hose that connects your tank or wall outlet to the grill is a wear item. It doesn't last forever, no matter how good the brand is. Heat, UV exposure, and ozone in the air all break down the rubber over time.
Here's what to look for. Run your fingers along the entire length of the hose, feeling for soft spots, bulges, or areas that feel brittle. Visually inspect for cracking, especially near the fittings where bending stress concentrates.
Look for any sign of "dry rot," which usually appears as fine surface cracks that expand with each use.
If you see any damage, replace the hose. They're not expensive, and the cost beats a potential explosion. Look for a hose that meets the ANSI Z21.58 standard for outdoor cooking gas appliances.
That certification means the hose has been tested for durability and leak resistance.
The Quick Connection Fitting
Most modern grills use a quick-connect fitting that snaps onto the regulator. That fitting contains a small rubber gasket that seals the joint. Over time, that gasket can dry out, crack, or shift out of place.
If your grill has been sitting all winter, the gasket might be brittle.
Inspect the gasket visually. If it looks flattened, cracked, or missing pieces, replace it. Some manufacturers sell rebuild kits for the quick-connect.
Others require a whole new hose assembly.
Here's a tip. When you connect the hose to the tank, hand-tighten only. A wrench will over-tighten the fitting, damaging the threads and the gasket.
Hand-tight, then a quarter turn with a wrench if you need more grip. Never force it.
The "Tripped" Regulator
If your grill suddenly loses flame and you smell gas, the regulator might have tripped. This happens when you open the tank valve too fast, overwhelming the regulator's internal mechanism. It's a safety feature, not a malfunction.
To reset, close the tank valve completely. Wait 30 seconds for pressure to drop. Open the valve slowly, half a turn, and pause.
Then try lighting the grill again. If it still won't light, check for leaks at the connection and verify the burners are clear.

Similar Posts



















