Grilled Nachos: A Step-by-Step Guide
If you've ever tried to make grilled nachos and ended up with a pan of burnt edges, raw cheese, and soggy chips, you already know the problem. It looks so simple in theory: chips, cheese, heat, done. Then reality hits, and you're scraping carbonized cheddar off a foil pan while your guests pretend not to notice.
The truth is, how to make grilled nachos comes down to understanding what the grill does to food that an oven simply can't. It's not just a hotter oven. It's a direct radiant heat source from below, no ambient moisture, and a narrow window between perfectly melted and ruined.
In our research across cooking forums, manufacturer guides, and aggregate home-chef reviews, the consensus is clear: the difference between great grilled nachos and a sad, smoky mess is all about heat management and timing. As of 2026, even major grill manufacturers have started including dedicated "plancha" and "skillet" zones on their products, which tells you how mainstream this technique has become.
Let's walk through it step by step.
Why Grilled Nachos Are Different (And Better) Than Oven-Baked
Oven-baked nachos work because they rely on ambient heat hitting the food from all sides. The cheese melts from the top down, the chips crisp up from the bottom, and everything happens at a relatively gentle 350°F. It's dependable.
It's also completely missing the point.
The grill changes the equation in three fundamental ways.
First, direct radiant heat from below. When you place a cast iron skillet on a grill grate, the heat isn't just warming the air around the chips. It's transferring directly through the metal into the bottom layer of tortilla chips. That creates a toasted, almost roasted flavor on the underside that you simply cannot replicate in a standard oven.
Think of it as the difference between a grilled cheese sandwich and a toasted one.
Second, smoke and char. Even on a clean gas grill, there's residual smoke from previous cooks and from the fat rendering off your toppings. That smoke gets absorbed into the cheese and chips as they heat. The result is a subtle depth of flavor that makes oven nachos taste flat by comparison.
On a charcoal grill, this effect is dramatically amplified. The USDA's grilling safety guidelines consistently emphasize that smoke flavor is a major reason people prefer outdoor cooking, and nachos are no exception.
Third, speed. A preheated grill running at medium heat will melt cheese and crisp chips in 7 to 10 minutes flat. An oven takes 12 to 15 minutes just to approach the same result because it has to heat a much larger volume of air. That speed matters because it reduces the window in which chips can absorb moisture and go limp.
The catch? That same speed works against you if you're not paying attention.
Here's the visual difference to understand before you start: in the oven, you take nachos out when the cheese looks melted and the edges look lightly browned. On the grill, you pull them off about 30 seconds before that point. The residual heat in the pan and the cheese continues cooking them after they leave the grate.
If you wait until they look perfect on the grill, they'll be burnt by the time you set the pan down. That's the single most important visual cue to internalize.

What You Need: The Gear and Ingredients That Matter
Not all pans, chips, and cheeses are built for the grill. Let's break down what actually works and why.
The Pan: Cast Iron vs. Foil
This is the first fork in the road, and it's a meaningful one.
Cast iron skillet. This is the gold standard. The thick walls and base distribute heat evenly, so you don't get hotspots where chips burn while the cheese a few inches away is still solid. Cast iron also retains heat beautifully, which means the pan keeps melting cheese even after you pull it off the grill.
A 12-inch skillet will comfortably feed four to six people as a main dish or eight as an appetizer.
The downside? It's heavy, it takes time to preheat properly, and it's a pain to clean afterward. But for the best possible texture and flavor, nothing else comes close.
Heavy-duty disposable foil pan. This is the practical option for tailgates, parties, and camping trips. A good-quality foil pan works well because the metal conducts heat efficiently and the shallow sides let you load up toppings without creating a giant container you need to haul home.
The catch is that cheap, flimsy foil pans buckle under the weight of chips, cheese, and meat. They also heat unevenly because the metal is so thin. Your edges will cook faster than the center.
You can mitigate this by doubling up the pans or placing a baking sheet beneath the foil pan on the grill grate. It's not perfect, but it works.
What about direct on the grates? Don't. This is the most common mistake in every beginners forum we reviewed. Chips fall through the grates, cheese melts into the fire, and you end up with a flare-up and a ruined dinner.
If we were to draw a diagram of this mistake, it would be a picture of a flaming pile of nachos. The pan is non-negotiable.
The Chips
Sturdy, restaurant-style tortilla chips are the only choice. Thin, delicate chips from a cheap bag will shatter under the weight of toppings and turn to mush within minutes. Look for thick-cut, ridged, or scoop-shaped chips.
They hold up to heat and moisture much better.
As a ratio, plan on about 6 cups of chips for a 12-inch skillet. That gives you two good layers without overcrowding.
The Cheese
Block cheese that you shred yourself beats pre-shredded every single time. Pre-shredded cheese is coated in cellulose and anti-caking starches to stop it from clumping in the bag. Those same agents interfere with melting, producing a grainy, clumpy texture instead of the smooth, gooey melt you want.
Aim for a blend of cheddar and pepper jack for the classic flavor profile. Cheddar brings sharpness, pepper jack brings creaminess and a little heat. Use about 2 cups of shredded cheese per 6 cups of chips.
That's a 1:1 ratio by volume, which is dense but appropriate for grilled nachos since the cheese also acts as a glue to hold the chips together.
The Toppings
There are two types of nacho toppings: ones that go on before the grill and ones that go on after.
Before the grill: cooked protein (ground beef, shredded chicken, pulled pork), beans, corn, sliced jalapeños, diced onions. These need heat to warm through or integrate with the cheese.
After the grill: pico de gallo, salsa, sour cream, guacamole, cilantro, sliced radishes, lime wedges. These are cold or fresh elements that would wilt, heat up, or lose texture if exposed to the grill.
We'll get into the full layering strategy in a dedicated section later, but the gear list is your foundation.
| Item | What to Look For | Why It Matters |
|---|---|---|
| Pan | 12" cast iron or heavy foil | Even heat distribution |
| Chips | Thick-cut, restaurant-style | Structural integrity |
| Cheese | Block cheddar + pepper jack | Smooth melt, bold flavor |
| Protein | Pre-cooked, drained well | No excess grease on grill |
| Grill | Medium heat, two-zone setup | Control over melting vs. charring |
The Setup: Building Your Grill Zones
Before a single chip touches the pan, you need to set up your grill for success. This is where most people skip a step and pay for it later.
Two-Zone Heat: The Non-Negotiable
The goal is to create two distinct heat zones on your grill: a direct heat zone and an indirect heat zone.
Direct heat zone: The burners are on, or the coals are spread out on one side. This area is hot and radiates intense heat from below. It's where you'll sear meat or, in this case, where you'll briefly toast the bottom of the pan if you want extra char.
Indirect heat zone: The burners are off, or the coals are piled to one side. This area has ambient grill heat but no direct radiant heat from below. It's where the nachos actually cook.
The heat is gentle enough to melt cheese without incinerating the chips.
For nachos, you want the grill preheated to 350°F to 400°F on the indirect side. Most gas grills take 10 to 15 minutes to reach this temperature with the lid down. Charcoal grills take about 20 to 25 minutes for the coals to ash over.
Gas Grill Setup
Turn on all burners to high, close the lid, and let the grill heat up for 10 minutes. Then, turn off half of the burners. You now have a hot zone and a cooler zone.
Place your skillet on the cooler zone. If you have a three-burner grill, use one burner on high and two off, or two on and one off, depending on your pan size.
Charcoal Grill Setup
Light a chimney starter full of charcoal briquettes. Wait until they're covered in gray ash, about 20 minutes. Dump them all to one side of the grill.
Place the grate on, put the skillet over the side without coals, and adjust the vents to maintain 350°F to 400°F. This gives you the direct zone on one side and indirect on the other.
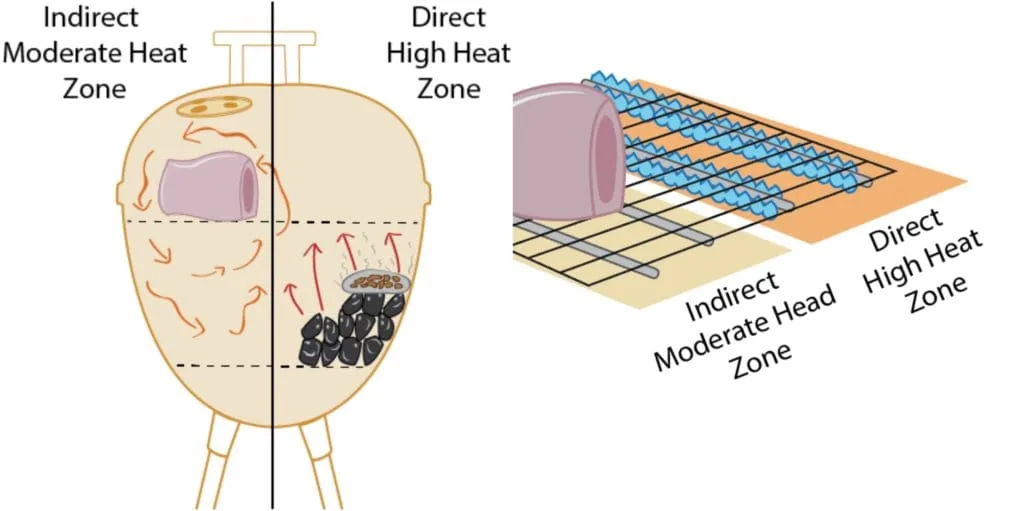
Why the Two-Zone Setup Matters
If you put the pan directly over high heat, the bottom chips will burn to charcoal before the cheese on top melts. The cheese needs gentle ambient heat to transform from solid shreds into a molten blanket. Direct heat works against that process.
As of 2026, even manufacturer guides like Weber's official setup recommendations explicitly call for two-zone cooking when using pans or skillets on the grate. It's not a niche technique. It's how the grill is designed to be used.
Preheating the Pan
Place the empty skillet on the indirect zone for 3 to 5 minutes during the preheat phase. The pan should be hot to the touch but not smoking before you add chips. This does two things: it instantly crisps the bottom layer of chips, and it prevents the cheese from sticking to the pan.
Step-by-Step: How to Make Grilled Nachos
Now we get to the actual process. Follow these steps in order, and you'll land exactly where you want to be.
Step 1: Build the Base in the Pan
Start with a single layer of chips in the bottom of the hot skillet. Don't stack them more than two deep, or the middle layer stays cold while the edges burn.
Sprinkle half of your shredded cheese over the chips. Add your pre-cooked protein, beans, or any other toppings that need heat. Then add a second layer of chips and top with the remaining cheese.
The goal is an even distribution. You want every chip to have some contact with cheese, but you don't want a giant mountain in the center.
Step 2: Get the Pan on the Grill
Carefully place the skillet on the indirect heat zone. Use two hands and heat-resistant gloves. A 12-inch cast iron skillet filled with chips and cheese is heavier than it looks.
Close the lid. This is crucial. The lid traps the heat and circulates it around the pan, melting the cheese from above while the pan works from below.
Leaving the lid open means the top layer of cheese barely melts.
Step 3: The 7 to 10 Minute Melt
Set a timer for 5 minutes. Close the lid and walk away. No peeking every 30 seconds.
Every time you open the lid, you let out heat and extend the cooking time.
After 5 minutes, open the lid and visually check the cheese. You're looking for the cheese to be mostly melted with just a few visible shreds remaining. If it's still raw, close the lid and check again in 2 minutes.
Step 4: Rotate and Monitor
After the first check, rotate the pan 180 degrees. This compensates for any hot spots in your grill. Even on a good grill, the back corner often runs hotter than the front.
At the 7-minute mark, check again. The cheese should be fully melted and starting to bubble. The chip edges should be lightly toasted, not charred.
If the edges look brown, the cheese is bubbling, and you can see just the faintest wisps of smoke, you're done.
Step 5: Pull It Off and Rest
Remove the pan from the grill immediately. Place it on a heatproof surface or a wire rack. The cheese is still molten at this point, so let it rest for 2 to 3 minutes.
This sets the cheese slightly, so it doesn't slide off the chips when you serve it.
The Visual Checkpoints
Here's what each stage should look like, so you know you're on track:
| Time | Visual Cue | What It Means |
|---|---|---|
| 0 min | Chips slightly warm, cheese shredded | Base is in place |
| 3 min | Cheese edges starting to soften | Heat is penetrating |
| 5 min | Most cheese melted, few shreds visible | Halfway there |
| 7 min | Cheese fully melted, edges toasting | Nearly done |
| 8-10 min | Cheese bubbling, chip edges golden brown | Pull it off NOW |
What Good Looks Like: Visual Cues at Every Stage
The grill doesn't come with a "done" alarm. You have to read the visual signals. Here's exactly what to look for at each stage of the cook.
The Chip Color Chart
- Too pale (under 5 minutes): The chips are still cool to the touch, and the cheese just started sweating. This is normal early on. Give it time.
- Golden brown edges: This is the sweet spot. The underside of the chips has a light to medium golden-brown tint from the pan's heat. The cheese is fully melted with a glossy sheen. This is when you pull the pan.
- Dark brown or black corners: You've gone too far. The edges are burnt, and the cheese is likely developing a skin. If this happens, scrape off the worst bits and salvage the rest. It's not pretty, but it's still edible.
The Cheese Melt Test
Perfectly melted cheese looks glossy, almost wet. It should have a slight sheen and visibly bubble. If the cheese looks dry, grainy, or has an oily film on top, you've either overheated it or used poor-quality pre-shredded cheese.
One common issue on the grill is oil separation. When cheese gets too hot, the fat separates out and pools at the bottom of the pan. This is a sure sign the heat is too high.
Move the pan to the cooler side of the grill immediately.

A Note on Smoke
A little wisps of smoke from cheese dripping onto the pan is fine. Thick billowing smoke is not. If you see heavy smoke, your pan is too hot, or grease from your toppings is pooling and burning.
Open the lid, move the pan to a cooler area, and let it settle down. Thick smoke will make the nachos taste acrid and bitter.

Similar Posts



















